Saturday, October 31, 2009
Submission of draft and Log book
The draft and log book for Final Year Project was submitted on week 13 (23/10/2009). The draft consist of Chapter I & II. Chapter I is Introduction and chapter II is Literature Review. Percentage mark for draft is 5% and log book is 10%.
Thursday, October 22, 2009
Test Method on Add-on SKXBEE
1. Configure the ATMY 1111 to SKXBEE for the robot and ATDL 1111 to SKXBEE for computer using X-TCU (refer User’s manual for SKXBEE section 6.2 for more detail on configuration).
2. Plug in the SKXBEE to the robot and switch ON the power, select “SKXBEE.”
3. Connect another SKXBEE on computer.
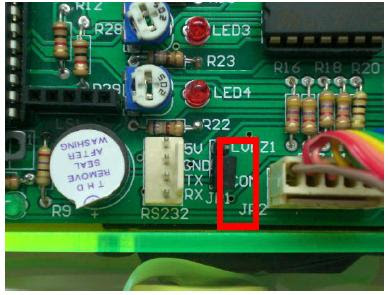
4. Make sure JP1 jumper is connected to COM for UART as shown in Figure.
5. Open X-TCU and click on the terminal, type “d”.
6. Now, user may control the robot using Num pad. 8 to move forward, 4 to turn left, 6 to turn right, and 2 to move backward.
2. Plug in the SKXBEE to the robot and switch ON the power, select “SKXBEE.”
3. Connect another SKXBEE on computer.
4. Make sure JP1 jumper is connected to COM for UART as shown in Figure.
5. Open X-TCU and click on the terminal, type “d”.
6. Now, user may control the robot using Num pad. 8 to move forward, 4 to turn left, 6 to turn right, and 2 to move backward.

Interface XBee Module with PIC Microcontroller
5V and ground is connected to provide power to the module. While TX and RX pin is connected for communication. JP1 jumper is connected at COM for interfacing SKXBEE.

Below is the system overview on how XBee communicate with microcontroller. The XBee will connected to the microcontroller via Universal Asynchronous Receiver/transmitter (UART) pins.

SKXBEE can be add on in the microcontroller circuit. It will lifted a bit high from microcontroller circuit or in other words above the microcontroller circuit. All we need to used is a female header.


Thursday, October 15, 2009
100+ node ZigBee PRO network
Demonstrates how a network of ZigBee PRO nodes based on embedded AVR microcontrollers and Atmel RF transceivers and running BitCloud stack assembles itself in a dense network setting. Provides visual overview of test network environment and WSN Monitor tool for network visualization and control.
This is an example of advanced programming for ZigBEE network..
This is an example of advanced programming for ZigBEE network..
Zigbee / XBee Adapter Configuration Tutorial
This tutorial shows how two XBee Modules can be configured to be able to talk to each other. These modules are ideal for any hobby/school/university project. With these modules it is very easy to interface PC to Microcontroller board, or Microcontroller to Microcontroller over wireless link.
Thursday, October 8, 2009
Mobile Robot Exploration with ZigBee
In this experiment, a mobile robot (red) is equipped with a ZigBee node; another ZigBee node (blue) is emitting a beacon. Using an heuristic algorithm based on LQI (Link Quality Indicator) the robot is able to find the beacon node without entirely explore the search space. This technique can be used, for example, in Search & Rescue scenarios.
Watch video..
Watch video..
Internet Remote Control ZigBee Robot
The Robot is being controlled from Sweden and it's performing a home inspection in real time in a Phoenix home. This is actual video that was recoded in Sweden from the high quality robot WEB based camera..
Watch video..
Watch video..
Draft Chapter 1 & 2 Final Project Thesis
Preparing to do the chapter 1 and 2 final project thesis..The draft need to be submited at week 13at 19/10/2009..
Thursday, October 1, 2009
Approximate Project Cost

Table above shown the approximate cost for the hardware's. The cost will change from time to time depending on the requirement. The cost can be reduced by removing some expensive applications.
How to Build Your First Robot
Robotics can teach you so much.I will learn skills ranging from electronics, mechanics, controls, programming, and even as broad as understanding animal behavior and human psychology. What does an easy to make robot look like? Browse the web for robot galleries. Remember, only bother looking at the really simple robots, DO NOT get imaginative or creative on your first robot. So your first robot will have 2 wheels. It will drive under the most basic algorithm for a robot - differential drive.

Let's start with the wheels. Big wheels will let your robot move faster. Small wheels for slower. So why not just get big? Bigger wheels means your robot has less torque to carry a heavy payload, and bigger wheels generally mean fine position control is harder too. Also, your sensors often cannot keep up with fast changes in position.
Ok now the motors. For an optimal robot choosing motors would involve calculations of weight, gearing ratios, desired terrain, desired velocity and acceleration, voltage, power consumption, controllability and a whole range of things too overwhelming for a beginner. So just wing it. Just make sure you keep your robot as light as possible, and get motors that can do overkill. But remember, bigger the motors, shorter your battery life, and more expensive and complicated your motor control circuitry will get.
Next comes power. No, solar power and eating slugs wont work. Use a battery. When buying a battery make sure they are rechargeable, have high mAh (energy capacity), and can output at least an amp at any time. Consider putting batteries in both parallel and in series to vary/control total voltage and mAh.

Ok now you need a cool circuit thingy. Forget about designing your own. It is best your first robot be simple, so a ready made circuit thingy is easiest. They are usually called microcontrollers, the most popular being PIC, Atmel/AVR, ARM, and BASIC Stamp based. Stamps are easier but offer less functionality.You can also handmake the programmer really cheap. Just make sure the controller you buy has a built in motor driver, LED's, and many analog input/output ports.
Now it is time to DESIGN, THEN BUILD, a robot chassis. A beginner may have difficulty designing just because he/she wouldn't know what does/doesn't work. 3D CAD program that shows placement of all parts, screws, everything. Parts were intentionally designed to require the least amount of drilling and cutting effort. You can never over design, especially when you are in a competition like battlebots where things break often, or don't have enough money/time to waste on mistakes.
This article can be a good guide to a beginner to start do a basic function of robot.Its explained from the simplest technology to the complicated technology.
By Society of robot website
Subscribe to:
Posts (Atom)

